Sunday, February 26, 2012

Weekend Project: Girl's Messenger Bag

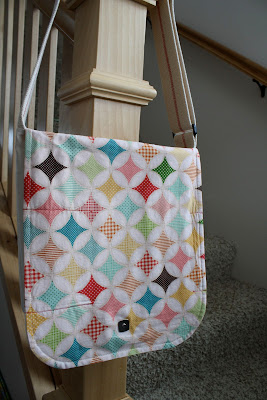
I started out my weekend with the itch to finally use these fabrics with the cathedral window block tutorial that I have been eyeing.  It was fun and really easy!  I upsized the initial square size to 14 inches to accommodate the size of the print in my feature fabric.


After completing a block featuring each the girl on the swing and the boy with the kite, I needed to make something with them.  I remembered seeing a fun embellished messenger bag and thought I'd give that idea a try.  I followed the general size guidelines in this tutorial from mmmcrafts, and then I put it together using my own method, adding tweaks along the way.  The more I worked, the more interested my 6-year-old daughter became in my project.  It slowly evolved from my bag to her bag.


The bag body is a heavy duck canvas

I installed a magnetic snap on the front flap, and picked up some buckle hardware to make the strap adjustable.  Since I live in a *very* small town in Alaska, I usually order my supplies or drive 80 miles to the nearest craft store.  Since we wanted to finish this bag ASAP, we took a trip to our local outdoor gear manufacturer's store and found plenty of options for hardware.  I decided that I'd like to use cotton webbing for the strap, so we stopped by our local fabric store, which is inside the TrueValue Hardware.  They are primarily a quilting shop and only had 1-inch webbing, so I put two lengths side-by-side and zig-zagged them together with red thread.  I think that detail makes the bag!

Outside pocket under the front flap

Inside of the flap


I posted a quick photo of the bag last night on my Facebook page and got a ton of positive feedback.  I think this is a favorite of everything I have created to date.  I have already ordered some more fabric (since I used nearly everything I had to create the bag) and hope to put some of these little beauties in my shop soon.  They are a great size for kids, but would also make a fun everyday bag for adults.

I added this to the list of fun weekend projects over at Skip to My Lou.

Thursday, February 23, 2012

What I'm Working On: Stash Building

Now that my Etsy shop is up and running (and turning a little bit of profit), I have started buying fabrics that I love just because I love them.  I have several projects in mind, but I love these fabrics so much that I am almost afraid to cut them!  Washing them is the first step, so into the laundry they go while I contemplate what to start on first.

I have wanted these since I first saw them!  They are from the Washi collection by Rashida Coleman Hale.  I love the charcoal background coupled with the bright colors.  I plan to make myself a bag from them, but I'm still toying with the design.  They will also make super cute makeup bags and iPad/Kindle cases. Just waiting on my latest shipment of zippers from ZipIt before getting to work.


I picked up these two prints from the Echo line after seeing a gorgeous tote made from the charcoal print by Ivey Expressions in the Hawthorne Threads newsletter a few weeks ago.  The gray in the fabric on the left isn't an exact match for the charcoal in the other, so I'm not quite sure what I will end up making with them.  


This next set is not my usual taste, but it is so darn cute I had to try it.  It's from the Fly a Kite line.  I have bookmarked a cathedral window quilt block made by folding the background fabric oragami-style, and I think this fabric would be perfect to try it out with.  Then maybe it will become something with a zipper.


If you know me, you will find an uncanny likeness in this print to my own kids!  Right down to the red-headed boy and curly girl...

Finally, I found a fabulous deal on The Intrepid Thread for half-yards of the entire collection of the Primitiva line.  The purples and oranges really jumped out at me, and it's not too "girly" to end up as a quilt for my own bed.  I've been keeping a collection of modern quilt ideas on Pinterest and hope to somehow use these fabrics to create my first "modern" quilt.  I have quilted in the past, but only using the traditional block structure.

I haven't yet decided if I want to use just part of the collection...


Or the entire thing...

And if I am going to use the true "modern" style, I should probably add some solids.  But I thought these may function as solids/backgrounds, depending on what I end up with.


I like structure, so piecing a quilt on the fly is going to be tough for me.  I ordered a book about it, of course.  Anyone have tips to get me started on a fun design with these fabrics?

Monday, February 13, 2012

Valentines for my Valentines

I am probably dooming myself for years down the road by giving my kids something handmade for Valentine's Day.  I'm sure they will remember next year that I made them something this year and expect it again.  Their little memories always amaze me.  But it's hard to resist my 3-year-old son's frequent exclamations of, "Mom, you are the best sewer EVER!"  So here I am, with two very cute little heart-shaped zip pouches to give to my very cute kids tomorrow.  I used the tutorial over at The Purl Bee.  This was my first foray into sewing a zipper on this tight of a curve, and it was not easy.  But I did it!  The key was to go very sloooowly.  I think my favorite is the circuit board side of the robot pouch.  There's some hidden meaning in there between the heart and the circuits, I think.


I foresee these pouches being used for treasures like rocks, Matchbox cars, and tiny horses.  It gives me the idea to try other shapes in pouches as well. Hmmm...

Wednesday, February 8, 2012

The Honolulu Bag

I posted about this bag on my Facebook page a couple of weeks ago, and I thought I'd expand on it here.  I was looking for a bag pattern to expand on my skills and definitely got more than I bargained for with this one.  The main concept of the bag is based on the Wasp Bag pattern from machen/machen.  I am not new to bag-making.  I can whip out a lined tote in no time flat.  This pattern had a couple of extras thrown in to give me a bit of a challenge- magnetic snaps and darts and pleats, oh my!  I started by scaling down the pattern a bit with my printer as I wanted it to be more of a shoulder bag than a tote.  I ended up with something in between, which was perfect for my intended use as a carry-on bag to hold my iPad and Kindle for a plane trip (to Honolulu, of course!). 


For the most part the pattern was easy to follow.  My main departure from the given directions came with strap construction.  The pattern pieces themselves were not clear on how to attach the pieces of the strap pattern together, so I had to improvise with strap length.  The method described for sewing the straps just seemed too difficult.  I opted to put wrong sides together, sew the edges, turn right-side-out, and then continue on with attaching and topstitching.  Much less room for error on the edges!  I tried leaving the button color choice up to my kids and offered the options of turquoise and orange.  They suggested a different color on each side of the bag (!) so I settled on the orange, which brings out the centers of the flowers perfectly. I really love the effect that using the print fabric on the backside of the straps gives. On my totes I use canvas for both sides of the straps, but I think I'll try using the lining fabric on the back next time.


On the bag interior, I designed my own interfaced slip pockets and sized them to hold my iPhone securely.  I also decided to finally learn how to insert an inner zip pocket using this tutorial.  The only issue I had with the inside came from the pleats on the lining intersecting with the pockets, which called for some careful placement.


I love the end result, and the bag has served me well so far and held up great through plane trips, beach excursions, and toy toting.


The main body of this bag is constructed of brown medium-weight canvas, and the outer and inner prints are cottons from Joel Dewberry's Aviary 2 collection.  My new labels from GutenTAGs made their debut as well.

What I'm Working On

This week I am getting back into the groove of things after a relaxing Hawaiian vacation.  I have yet to start up my sewing machine, but I will. Today. Yes.

First up is work on altering a pattern to transform it from a wallet to an e-reader case.  I started out with this pattern from Keyka Lou for a clutch wallet.  I have a few of these adorable wallets in my Etsy shop already.

My intent was to add padding and supersize it into an iPad case, but after doing just that I found it to be just too large when opened to be practical.


So now I need to downsize it a bit and turn it into an e-reader case (you know, for a Kindle, Nook, Kindle Fire, etc.).  I love this fabric too much to let it go to waste, and if I can make it work I will have a handy case with an inside zipper pocket for the charger or pen and paper.

Tuesday, February 7, 2012

Introducing...a.Amelia handmade, the blog!

I have been putting this off for awhile now.  I have an Etsy shop and a Facebook page...why do I really need a blog?
I guess there are a few reasons, really:
-to share my finds on everything sewing- patterns, tutorials, fabrics, shops
-to get input on works in progress
-to be able to enter contests which require a blog (which is the real motivator that put me over the edge today!)

So take a look around and let me know what you think.  I'm still working out the kinks with appearance and hope to add a photo gallery-type page of my favorite completed projects within the next couple of days.