Showing posts with label messenger bag. Show all posts

Sunday, September 16, 2012

Military Uniform Upcycle, Part 2: Cargo Pants to Messenger Bag

Oh, what to do with old Coast Guard ODU pants with such an attractive backside as this:


 And huge cargo pants right on the hip area, so big that my son can fit his head inside:


Thanks to the inspiration from Noodle-head, I decided to try turning a pair into a messenger bag, with the cargo pocket on the flap.  With the high position of the pocket, I needed to add in fabric from the back of an ODU blouse in order to get enough pocket-free fabric to construct the bag.

Here's what I came up with:


I tried using binding around the flap like the original idea, but the cotton quilting-weight fabric I was using for my lining just didn't play well with the heavier-weight nylon blend of the uniform.  Now I understand why my blogger friend and seamstress-extraordinaire Maureen strongly urged me not to pair the uniform fabric alongside beautiful high-quality designer cottons for a quilt.  That would have been disastrous.  I also used a more basic messenger bag construction, with just the flap pieces plus a front and back (leaving out the separate gusset pieces).  I then boxed the corners, with what ended up as a 2" gusset seam after several sizing tweaks.  If you're not familiar with messenger bag construction, it's really pretty simple.  Here's a great starting point, from mmmcrafts.

My final bag dimensions were 12" long by 10" across, not much larger than the pocket itself.  I originally made it 3" wider and then took it apart and cut it down to better match the flap size.


 The cargo pocket itself has some rather large pleats.  I added a magnetic snap to the flap to help keep it in place when closed, in case I put too much stuff in the outer pocket.


 I prefer to make my messenger bag straps adjustable.  Usually I wear them cross-body style, but sometimes I like to shorten up the strap and use it like a shoulder bag.


My lining fabric is from Hello Pilgrim by Lizzie House.


 I attached a slip pocket to the inside for my phone and pens.


 After removing the binding from the flap, the outside looked a little plain.  I tried out different ways of dressing it up...


And I even removed the name tapes and rank symbols from the uniform blouse.


I think the rank patches would be a fun addition if I were to use several of them in a row, so they don't scream, "This patch came from a Lieutenant." I'm not one who really likes to advertise rank, especially when it's not my own.  I do kinda like the US Coast Guard tape across the flap pocket.  But in the end, I decided to leave my bag plain.  The color on the back of the strap is enough for me this time around.


And look at that.  After saying in my last post how much I didn't need another bag, here I go claiming this one as my own.  Sheesh.  Well, I suppose it will come in handy since my Zakka Style Stem Messenger Bag was a bit overused this summer and is showing some wear at the seams.

Thursday, May 31, 2012

In Love With...

my Zakka Style Stem Messenger Bag!!  I have been looking forward to this project since the sew-along began.  I haven't kept up with the projects as much as I had hoped, mostly due to the last month of school activities and our town's community-built playground effort, but thankfully things seem to be calming down.

I jumped ahead a few weeks ago and made the zip organizer.  You'll have to wait til next week to see the finished product.  But I made the Stem Messenger Bag to match my organizer!  I absolutely love it.  Working with this book has me using linen for the first time, and it has such a great weight and feel to it.  Aside from having issues keeping it squared up when cutting out project pieces, I really enjoy the natural fibers.  (I have fixed that issue by ironing interfacing onto the linen of the correct size and shape before cutting the linen out.)

Sooo...here's my new favorite bag!  Completed just in time for the Great Alaskan Road Trip next week that my kids and I are taking...from Homer to Fairbanks and back, via Denali National Park.  This bag will hold all of my travel necessities- phone, wallet, notebook, iPad, Kindle (techie, here!), Alaska TourSaver Book, smaller camera, snacks... It has lots of pockets, and I added a magnetic snap closure on the flap so that things don't fly out while I'm chasing my 4-year-old.

Gray linen with Outfoxed and Fly a Kite


I made my own double-fold bias binding for the first time...I can see how that could get addicting!  I envisioned an entire Etsy shop with handmade binding.

Fab design in the Zakka Style book- outside pockets and inside pockets to hold just about everything.

I made my strap out of two pieces of black cotton webbing zig-zagged together with teal thread.  My loops are nylon from my local marine hardware supplier.

Pocket on the back.  Attaching the flap this way was tricky and it doesn't look very neat on the inside top edge.  Next time I'd probably put it on the "regular" way.

Just the right size.

Sunday, February 26, 2012

Weekend Project: Girl's Messenger Bag

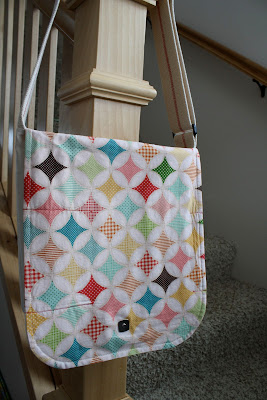
I started out my weekend with the itch to finally use these fabrics with the cathedral window block tutorial that I have been eyeing.  It was fun and really easy!  I upsized the initial square size to 14 inches to accommodate the size of the print in my feature fabric.


After completing a block featuring each the girl on the swing and the boy with the kite, I needed to make something with them.  I remembered seeing a fun embellished messenger bag and thought I'd give that idea a try.  I followed the general size guidelines in this tutorial from mmmcrafts, and then I put it together using my own method, adding tweaks along the way.  The more I worked, the more interested my 6-year-old daughter became in my project.  It slowly evolved from my bag to her bag.


The bag body is a heavy duck canvas

I installed a magnetic snap on the front flap, and picked up some buckle hardware to make the strap adjustable.  Since I live in a *very* small town in Alaska, I usually order my supplies or drive 80 miles to the nearest craft store.  Since we wanted to finish this bag ASAP, we took a trip to our local outdoor gear manufacturer's store and found plenty of options for hardware.  I decided that I'd like to use cotton webbing for the strap, so we stopped by our local fabric store, which is inside the TrueValue Hardware.  They are primarily a quilting shop and only had 1-inch webbing, so I put two lengths side-by-side and zig-zagged them together with red thread.  I think that detail makes the bag!

Outside pocket under the front flap

Inside of the flap


I posted a quick photo of the bag last night on my Facebook page and got a ton of positive feedback.  I think this is a favorite of everything I have created to date.  I have already ordered some more fabric (since I used nearly everything I had to create the bag) and hope to put some of these little beauties in my shop soon.  They are a great size for kids, but would also make a fun everyday bag for adults.

I added this to the list of fun weekend projects over at Skip to My Lou.