Showing posts with label cathedral window. Show all posts

Sunday, November 4, 2012

Cathedral Window Quilt: Complete!


It's finished!!  I know I got a bit behind on posting each of my blocks in the Cathedral Window Sampler Quilt-along.  You can see the detail on each individual block here in my flickr set.  I love how this came out so much that I decided to take it to one of my favorite spots for a little photo shoot.  I made this for my own living room, with fabrics from Fly a Kite and Outfoxed.  I used Maureen Cracknell Handmade's quilt-as-you go method, so when the quilt along was over all I had to do was sew my blocks together.


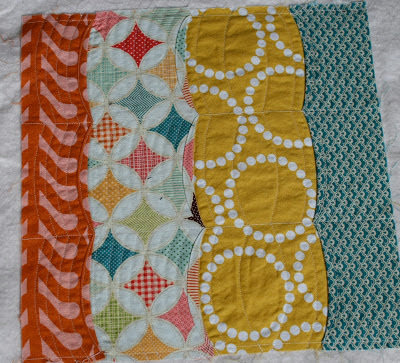
I added a cathedral window block of my own, based around a little cathedral window I already had waiting in my stash for just the right project.  Then I added two plain 12.5" squares of fabric to make a 3x4 quilt.  And I even remembered to add a label.


The backing is from Loulouthi by Anna Maria Horner.  I had it in my stash, and it happened to go perfectly.  I used the "self-binding" technique for the backing for the first time.  Basically, I trimmed the backing to 1.5" larger than the quilt (after quilting the backing fabric to the rest of the quilt) and then folded the raw edge of the backing in to meet the raw edge of the front.  Then I pressed the folded edge over the front and machine stitched all the way around.  Voila!  No hand sewing involved.  In the whole quilt.  Hooray for that!!


Here's a little better look at the quilting on the front...although the bright sunshine this morning makes some of it hard to see.


Perfect for a cold Alaskan morning at the beach!  And since the sand is frozen, it didn't even get dirty.


Monday, October 15, 2012

Cathedral Window QAL Block 4 and Quilting As I Go

I worked on block 4 last Friday.  It was super simple, which was a nice change after the complexity of block 3.


You may have noticed that the above block is already quilted.  Oh yes it is!  I have seen many methods of "quilting as you go" but have never tried it myself.  The whole having to hand-sew the backing on the blocks together made it a no-go for me.  But then Maureen Cracknell Handmade posted this awesome (and awesomely simple!) tutorial last week.  I may now actually finish the quilts that I start!  Hooray!  

Basically, her method has you quilt each block to its own square of batting, sew all of the quilted squares together, and then attach the backing with a minimum amount of quilting.  I think it's going to be awesome.  Did I already say that?  Well, fabulous, then.  I tried it out this weekend on my completed blocks, and it works really well for projects such as this where all the blocks are different.  You can really make the quilting complement each block individually.  The only downside of this method, for me anyway, is that the quilting patterns on each block don't translate to the backing fabric.  The backside of the quilting is hidden inside the quilt.  BUT, if I have to choose between paying someone a ton of money to longarm quilt for me, try to quilt myself the traditional way where I need to set up 3 extra tables to hold the bulk of my quilt, or not have the backing show the quilting stitches on the front, then I choose option 3 hands down.  Hiring out a longarm quilter makes the quilt feel like it's not completely my creation.  For that reason, I still haven't completed this quilt for my daughter from August.  I just can't bring myself to try to fit it through my machine, although I know I could do it.  I'm thinking about dismantling it a bit and using the quilt as you go method, and then sewing it back together.  For the first time since I began quilting nearly 10 years ago, the quilting part is actually fun!

Here's a little peek at my quilting so far:
Pins and more pins

This block was a little tricky, because my needle kept getting stuck in the Heat n Bond that was used in its construction.  I ended up quilting just the little background squares that peek through the stripes.

Back of Block 3


Block 3: I loved quilting this one!

Back of Block 3

Block 4

Back of Block 4

Ooh, I can't wait to finish this!


Monday, October 1, 2012

Cathedral WIndow Quilt Along, Block 1

Now that I have gotten in the groove of having the kids back in school and the hubby away, it's time to start working on some projects for myself.  I have a rough plan in mind for a new quilt for my bed based on the Uneven Coins block in the book Block Party. I have a whole stack of Indie, plus yards of navy solid to use with it.  I just need to make myself cut into it and get started.

I spotted this Cathedral Window quilt-a-long last week and thought maybe I'd use it to make some pillows to go with my quilt.  I like "a-longs" because I usually learn new techniques and make something I otherwise wouldn't.  Today was Block 1, a layered cathedral window from Sara at Sew Sweetness.  I love her choice of fabrics, as usual.  I also really like the look of the finished block.  But when I realized how much fabric goes into one 12" block (almost half a yard, really), I put away my special quilt stash and pulled out some things from the back of my fabric drawer to use first.  I paid attention to my print directions and order of assembly to make the design of the block stand out more than it does in Sara's scrappy version.  I really like the end result.  However, there are 5 layers of fabric in most spots on the block. That means you sew through 10 layers to join the four squares together.  I felt like I should have pulled out my walking foot.  I can't imagine making a quilt using this block.  It would be very heavy.  It would make a great pillow, though, which is what mine may become.  Eventually.

I'm looking forward to the next block on Thursday, and will probably use the same fabrics as long as I have enough of them.  In the end maybe I'll go back and choose my favorite blocks to go with my quilt.   That I still need to start.  Hmph.


Sunday, February 26, 2012

Weekend Project: Girl's Messenger Bag

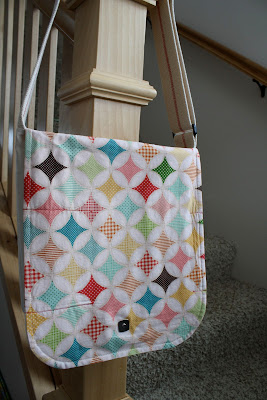
I started out my weekend with the itch to finally use these fabrics with the cathedral window block tutorial that I have been eyeing.  It was fun and really easy!  I upsized the initial square size to 14 inches to accommodate the size of the print in my feature fabric.


After completing a block featuring each the girl on the swing and the boy with the kite, I needed to make something with them.  I remembered seeing a fun embellished messenger bag and thought I'd give that idea a try.  I followed the general size guidelines in this tutorial from mmmcrafts, and then I put it together using my own method, adding tweaks along the way.  The more I worked, the more interested my 6-year-old daughter became in my project.  It slowly evolved from my bag to her bag.


The bag body is a heavy duck canvas

I installed a magnetic snap on the front flap, and picked up some buckle hardware to make the strap adjustable.  Since I live in a *very* small town in Alaska, I usually order my supplies or drive 80 miles to the nearest craft store.  Since we wanted to finish this bag ASAP, we took a trip to our local outdoor gear manufacturer's store and found plenty of options for hardware.  I decided that I'd like to use cotton webbing for the strap, so we stopped by our local fabric store, which is inside the TrueValue Hardware.  They are primarily a quilting shop and only had 1-inch webbing, so I put two lengths side-by-side and zig-zagged them together with red thread.  I think that detail makes the bag!

Outside pocket under the front flap

Inside of the flap


I posted a quick photo of the bag last night on my Facebook page and got a ton of positive feedback.  I think this is a favorite of everything I have created to date.  I have already ordered some more fabric (since I used nearly everything I had to create the bag) and hope to put some of these little beauties in my shop soon.  They are a great size for kids, but would also make a fun everyday bag for adults.

I added this to the list of fun weekend projects over at Skip to My Lou.