Showing posts with label Maureen Cracknell Handmade. Show all posts

Sunday, November 4, 2012

Cathedral Window Quilt: Complete!


It's finished!!  I know I got a bit behind on posting each of my blocks in the Cathedral Window Sampler Quilt-along.  You can see the detail on each individual block here in my flickr set.  I love how this came out so much that I decided to take it to one of my favorite spots for a little photo shoot.  I made this for my own living room, with fabrics from Fly a Kite and Outfoxed.  I used Maureen Cracknell Handmade's quilt-as-you go method, so when the quilt along was over all I had to do was sew my blocks together.


I added a cathedral window block of my own, based around a little cathedral window I already had waiting in my stash for just the right project.  Then I added two plain 12.5" squares of fabric to make a 3x4 quilt.  And I even remembered to add a label.


The backing is from Loulouthi by Anna Maria Horner.  I had it in my stash, and it happened to go perfectly.  I used the "self-binding" technique for the backing for the first time.  Basically, I trimmed the backing to 1.5" larger than the quilt (after quilting the backing fabric to the rest of the quilt) and then folded the raw edge of the backing in to meet the raw edge of the front.  Then I pressed the folded edge over the front and machine stitched all the way around.  Voila!  No hand sewing involved.  In the whole quilt.  Hooray for that!!


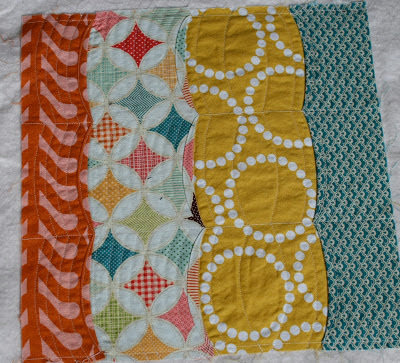
Here's a little better look at the quilting on the front...although the bright sunshine this morning makes some of it hard to see.


Perfect for a cold Alaskan morning at the beach!  And since the sand is frozen, it didn't even get dirty.


Monday, October 15, 2012

Cathedral Window QAL Block 4 and Quilting As I Go

I worked on block 4 last Friday.  It was super simple, which was a nice change after the complexity of block 3.


You may have noticed that the above block is already quilted.  Oh yes it is!  I have seen many methods of "quilting as you go" but have never tried it myself.  The whole having to hand-sew the backing on the blocks together made it a no-go for me.  But then Maureen Cracknell Handmade posted this awesome (and awesomely simple!) tutorial last week.  I may now actually finish the quilts that I start!  Hooray!  

Basically, her method has you quilt each block to its own square of batting, sew all of the quilted squares together, and then attach the backing with a minimum amount of quilting.  I think it's going to be awesome.  Did I already say that?  Well, fabulous, then.  I tried it out this weekend on my completed blocks, and it works really well for projects such as this where all the blocks are different.  You can really make the quilting complement each block individually.  The only downside of this method, for me anyway, is that the quilting patterns on each block don't translate to the backing fabric.  The backside of the quilting is hidden inside the quilt.  BUT, if I have to choose between paying someone a ton of money to longarm quilt for me, try to quilt myself the traditional way where I need to set up 3 extra tables to hold the bulk of my quilt, or not have the backing show the quilting stitches on the front, then I choose option 3 hands down.  Hiring out a longarm quilter makes the quilt feel like it's not completely my creation.  For that reason, I still haven't completed this quilt for my daughter from August.  I just can't bring myself to try to fit it through my machine, although I know I could do it.  I'm thinking about dismantling it a bit and using the quilt as you go method, and then sewing it back together.  For the first time since I began quilting nearly 10 years ago, the quilting part is actually fun!

Here's a little peek at my quilting so far:
Pins and more pins

This block was a little tricky, because my needle kept getting stuck in the Heat n Bond that was used in its construction.  I ended up quilting just the little background squares that peek through the stripes.

Back of Block 3


Block 3: I loved quilting this one!

Back of Block 3

Block 4

Back of Block 4

Ooh, I can't wait to finish this!


Sunday, August 5, 2012

Getting Scrappy

Sheesh, almost an entire month since my last post!  As much as I love summer, I'm very ready for the start of fall, which brings school, routine, and more time to sew!

I have been fitting in small projects here and there.
Canvas and cotton nesting bowls
Cotton and linen potholders

Linen and cotton nesting bowls

Linen and cotton wallets

But my largest project in the works, a queen-sized quilt for my bed, has been at a standstill.  As much as I love making the New York Beauty blocks that I had originally intended to solely use, meandering their way around the quilt, I just don't think it's practical to stick to the original plan if I ever want to actually finish the quilt.

My New York Beauty blocks awaiting some company

That point was reaffirmed this weekend when I found this stack of paper-pieced blocks that I started at least 5 years ago.

Hmmm...maybe these need to become something new...iPad cases? Cosmetics bags?

I had a lightbulb moment the other night regarding the quilt.  My original intent was to make it more modern than traditional.  Starting with the very traditional paper-pieced blocks, I needed to add something much less conventional to achieve the modern look.  I am always inspired by Maureen Cracknell's beautiful projects and color choices, and I remembered some scrappy chevron blocks she shared awhile back.  My new plan is to make strips of scrappy chevrons and mix them in with my New York Beauties and some strips of solid gray.  I'm using the tutorial at Six White Horses for the chevrons.  This scrappy, not-so-planned idea is much more forgiving and fun, even though I do find paper piecing relaxing.  I cut a bunch of strips tonight.  Stay tuned for the results!

Strips ready to get scrappy