Tuesday, May 28, 2013

The roly-poly-along blog tour and giveaway


For the longest time, I was intimidated by sewing clothing.  I was making tons of bags, wallets, iPad cases, etc., but the thought of making something that actually had to fit someone and look good was scary.  Along came Rachael from imagine gnats, who is constantly posting cute pics of things she makes for her girls to wear.  When she asked me to test out her roly-poly pinafore pattern, it was the final push I needed to give garment sewing a go.  And now I seem to be slightly addicted!  Oops!

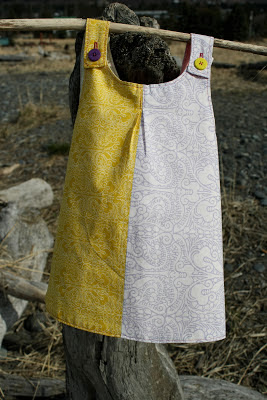
Really, though, if you have never sewn a garment, this is a great pattern to start out with.  It's cute, simple, functional, and can be made your own in a thousand different ways.  Have you stopped by the other blog tour spots?  There are some really amazing designs!  I chose to go a little more simple and focus on my sewing technique, but I did split the front into two different fabrics to give it a color-blocked look.  I made it fully reversible, with buttons on both sides.  My girlie loved the pockets on the original test version that I sewed up, but I hit a mind block when trying to figure out how to do pockets accessible from both sides of the reversible look.  After I decided to omit them altogether, I realized that I just needed two sets of pockets, one on each side.  Oh well--there's always next time.  Because there will be many next times with this one.

  
  The reverse side


I took the time to really work on my pleats and
topstitching,
 especially since I used contrasting thread!


One happy roly-poly girlie!
How about a copy of the pattern for yourself?  Just comment on this post and be entered to win one!  You can earn an extra entry by liking my Facebook page and commenting that you did.  Be sure I can reach you via email.  Giveaway will close May 31 at 5pm AK time.
You can also purchase the pattern right now on Etsy here.

Be sure to visit the rest of the stops on the the tour!


5.13 Jill Made with Moxie / Stephanie The Crafty Kitty
5.14 Stephanie NeurosesGalore / Cherie you & mie
5.15 Ari Max California / Caila Caila Made
5.16 Veronica SewVery / Tara Girl like the sea
5.17 Nancy owen's olivia / Adrianna Crafterhours

5.20 Ajaire Call ajaire / Sarah EmmylouBeeDoo
5.21 Laura Craftstorming / Jessica a little gray
5.22 Frances Miss Matatabi / Nicke kiss kiss quilt
5.23 Amy formwork design / Kat Sew Chibi
5.24 Joanne Rose & Dahlia / Amanda Kitschy Coo

5.27 Celina Petit a Petit and family / Delia Delia Creates
5.28 Christy a.Amelia handmade / Carolyn Fake It While You Make It
5.29 Bonnie Fishsticks Designs / Maria La Inglesita
5.30 Jane Buzzmills / Kate Things for Charlie
5.31 Polly Jack & GeeGee / Molly Rose & Odin


Thursday, May 16, 2013

Pattern Testing and Blog Touring

Ever since Rachael got me started on pattern testing and sewing kids clothing at the same time, I have been on a roll with both.  My kids are loving my newfound skills, and I love testing patterns because I always learn something new.

The tumble tee pattern test was no exception.  Here's a little sneak peek at the dress version of the pattern, coming soon from imagine gnats.  Her included tips on finishing seams in knits made me pull out my sewing machine manual and learn the overlock stitch, which is pretty darn close to a serger stitch.  Who knew?!  It's pretty obvious that my girlie loves the dress.


Thanks to the afore-mentioned first pattern that I tested for Rachael, the roly-poly pinafore, I'm a stop on the roly-poly-along blog tour that is going on right now!  Stop by on May 28 to see a new version of the roly-poly that I made, and check out the other stops on the tour for lots of fun ideas. I'll even have a copy of the pattern to give away!


Wednesday, May 15, 2013

Indie Quilt: Finished!

Finally.  After much procrastination, it's done.

I put off the backing and binding for weeks.  It's my least-favorite part of making a large quilt. It's just so hard to get the fabric completely smooth.  At least the front was already quilted, so I knew that part would look wrinkle-free.  I don't recommend the use of quilt basting spray.  Yikes.  What a mess.  Just ask my poor husband, who really tried to help me with that part.  By the end, our socks were sticking to the floor, and the quilt was crooked and creased.  But we emerged victorious!

This came out exactly as I envisioned it, which nearly never happens to me.  I kinda made it up as I went, with the intent of having large enough pieces of the prints to be able to fully appreciate them.  I just love this fabric! (Indie by Pat Bravo, in case you missed that part.)  I sewed up the strips first, and then quilted as I sewed them together into rows.  The top corner has a blank navy rectangle, which adds  a fun bit of asymmetry.


I detest hand-sewing binding, so I wrapped the edges of the backing around to the front and machine stitched the whole thing.


The backing is a couple of large pieces of my favorite prints from the front.