Friday, October 26, 2012

The Long Weekend

If you "like" my page on Facebook, you may have seen the pic I posted today showing the towering stacks of fabric, skeins of yarn, and general messiness on my sewing desk.  I have several projects going right now- the Cathedral Window Quilt-Along has 2 blocks left for me to make, I have a quilt to finish for my daughter, a quilt to start for myself, plus lots of random smaller projects for my Etsy shop. I definitely don't need to add anything to that list right now.

But then I came across the Long Weekend blog hop, in which a whole bunch of people are going to attempt Amy Butler's Weekender Bag pattern all at the same time.  I have been eyeing this pattern for about a year.  But I have been afraid to try it, because there is a ton of information out there in blogland about how difficult it can be.  And expensive to make.  I figured now is as good a time as any to give it a go.  So I ordered the pattern and bought all of the materials (which, indeed, were not cheap...at all...sheesh).  I'll post updates as I work on it.  I hear the cutting the pattern pieces out takes the longest. Guess I'll start that on Monday!


I chose cotton twills from Oh Deer! by MoMo for Moda.  The green is the body and the dots are for trim and lining.

The materials: sew-in and iron-on interfacing, cording for piping (eek!), a huge zipper (I got two colors because I didn't have my fabric picked out when I bought them), and template plastic.

Tuesday, October 23, 2012

AGF October Challenge: Mending Kit


I am so, so proud of this project!  Last month I discovered that Art Gallery Fabrics hosts a monthly sewing challenge.  I actually won last month's with my fab laptop sleeve:


This month's challenge was a mending kit.  I despise hand sewing.  But it is a necessary evil.  So I made myself participate in the challenge, hoping to make something that I will love using enough to make hand sewing not so terrible.  I think it worked!

I designed this kit, using fabrics from the Indie line by Pat Bravo (my very favorite, could you tell?), using nothing but the bag-making skills I have learned over the past year and my trusty iPad sketching "pen."  It turned out just as I had hoped--or maybe even a little better.

The outside is lightly gathered, with a fun contrasting strip down the middle.  Inside there are two zippered pockets (with metal zippers to give it a little edge) that can hold buttons, needles, and even my hexie-making templates.   I added a little loop to hold my favorite metal ruler, a pocket for my scissors, and elastic loops for my thread.  I have lots of thread, and always seem to buy the same size spools, so I made the loops to hold this specific size.  The little pin cushion attaches with velcro.  I used DecorBond on both sides for extra stability, and sandwiched a piece of cotton batting in there too.  The whole thing folds in thirds (a requirement of the challenge) and fastens with an elastic loop and fun wooden button.

All folded up, it looks like a fun little clutch.  Did I mention how much I love it?!?!


I wish I had discovered these challenges earlier in the year.  Those who complete them all are in the running to win a new sewing machine.  There's no way I can catch up now, but I'm so glad I found them.  It's always nice to give myself a way to expand on my design skills.

Tuesday, October 16, 2012

Purse Week 2012 Finalist!

I just found out that the Art Student Tote that I made as a diaper bag for my cousin is in the top 10 for Lemon Squeezy Home's Purse Week 2012!


Stop by A Lemon Squeezy Home and take a look at the other fantastic entries in the top 10.  I can't believe my bag is among them!  Here's the flickr group with all of the entries.  They are amazing.  Voting for the winner is open until Monday, October 22.  Just go to A Lemon Squeezy Home, and click for your favorite on the right hand size of the page.  Super simple, no log-in required!

Monday, October 15, 2012

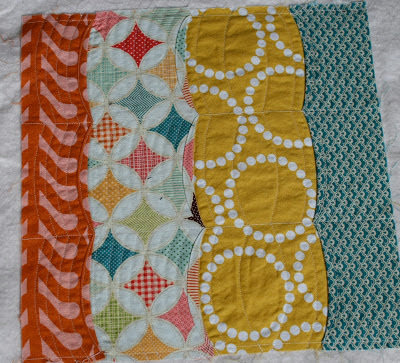
Cathedral Window QAL Block 4 and Quilting As I Go

I worked on block 4 last Friday.  It was super simple, which was a nice change after the complexity of block 3.


You may have noticed that the above block is already quilted.  Oh yes it is!  I have seen many methods of "quilting as you go" but have never tried it myself.  The whole having to hand-sew the backing on the blocks together made it a no-go for me.  But then Maureen Cracknell Handmade posted this awesome (and awesomely simple!) tutorial last week.  I may now actually finish the quilts that I start!  Hooray!  

Basically, her method has you quilt each block to its own square of batting, sew all of the quilted squares together, and then attach the backing with a minimum amount of quilting.  I think it's going to be awesome.  Did I already say that?  Well, fabulous, then.  I tried it out this weekend on my completed blocks, and it works really well for projects such as this where all the blocks are different.  You can really make the quilting complement each block individually.  The only downside of this method, for me anyway, is that the quilting patterns on each block don't translate to the backing fabric.  The backside of the quilting is hidden inside the quilt.  BUT, if I have to choose between paying someone a ton of money to longarm quilt for me, try to quilt myself the traditional way where I need to set up 3 extra tables to hold the bulk of my quilt, or not have the backing show the quilting stitches on the front, then I choose option 3 hands down.  Hiring out a longarm quilter makes the quilt feel like it's not completely my creation.  For that reason, I still haven't completed this quilt for my daughter from August.  I just can't bring myself to try to fit it through my machine, although I know I could do it.  I'm thinking about dismantling it a bit and using the quilt as you go method, and then sewing it back together.  For the first time since I began quilting nearly 10 years ago, the quilting part is actually fun!

Here's a little peek at my quilting so far:
Pins and more pins

This block was a little tricky, because my needle kept getting stuck in the Heat n Bond that was used in its construction.  I ended up quilting just the little background squares that peek through the stripes.

Back of Block 3


Block 3: I loved quilting this one!

Back of Block 3

Block 4

Back of Block 4

Ooh, I can't wait to finish this!


Wednesday, October 10, 2012

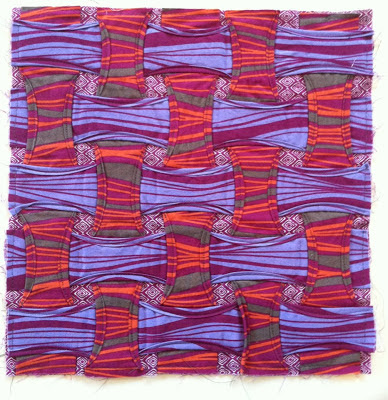
Cathedral Window QAL: block 3

Ack, I missed posting block 2.  It was a super-cool design by Bree that has lots of motion.  I stuck with using fabrics from my "to experiment with" fabric pile, and came up with a very flowy block.
It reminds me of fall, which is just about over in my neck of the woods.

Block 3 instructions were posted on Monday, and I had a lightbulb moment.  This block is so fun and modern looking.  It made me switch from my experimental stash to my "saving for just the right project" stash.  I have a combination of fabrics from Outfoxed and Fly a Kite that I wanted to use for a lap-ish sized quilt for my living room, and this block is a great way to showcase the fun prints!

I loved making Block 3, because it was quite a challenge to get it all together correctly.  The directions were very clear, though.  I did have a couple of slip-ups that could have been prevented with a little more pre-planning.  I cut the focus pieces oriented as squares, and then had to go back and re-cut them as diamonds. I also didn't think about the darker frame fabric showing through the lighter focus fabrics when the block was complete.  I left that as-is, but I'll be sure to think about that if I make another.  My only real issue with the finished block is that the areas containing the focus pieces are a bit stiff due to the iron-on adhesive I used.  It may have been heavier-weight than what was called for in the directions, but I just used what I had on hand.  Oops.  Next time, I might just try basting the focus fabric squared onto the frame fabric instead.


I think I'll go back and re-do blocks 1 and 2 in these fabrics so I can use them all together.  I am really loving the completely modern spin on the traditional cathedral window pattern!

Monday, October 1, 2012

Cathedral WIndow Quilt Along, Block 1

Now that I have gotten in the groove of having the kids back in school and the hubby away, it's time to start working on some projects for myself.  I have a rough plan in mind for a new quilt for my bed based on the Uneven Coins block in the book Block Party. I have a whole stack of Indie, plus yards of navy solid to use with it.  I just need to make myself cut into it and get started.

I spotted this Cathedral Window quilt-a-long last week and thought maybe I'd use it to make some pillows to go with my quilt.  I like "a-longs" because I usually learn new techniques and make something I otherwise wouldn't.  Today was Block 1, a layered cathedral window from Sara at Sew Sweetness.  I love her choice of fabrics, as usual.  I also really like the look of the finished block.  But when I realized how much fabric goes into one 12" block (almost half a yard, really), I put away my special quilt stash and pulled out some things from the back of my fabric drawer to use first.  I paid attention to my print directions and order of assembly to make the design of the block stand out more than it does in Sara's scrappy version.  I really like the end result.  However, there are 5 layers of fabric in most spots on the block. That means you sew through 10 layers to join the four squares together.  I felt like I should have pulled out my walking foot.  I can't imagine making a quilt using this block.  It would be very heavy.  It would make a great pillow, though, which is what mine may become.  Eventually.

I'm looking forward to the next block on Thursday, and will probably use the same fabrics as long as I have enough of them.  In the end maybe I'll go back and choose my favorite blocks to go with my quilt.   That I still need to start.  Hmph.